Garrattfan's Modelrailroading Pages
NS 6200 class
Frame
The frame does not need extensive rework, at least not in that it needs a complete cut up and rebuild project. In fact the record breakingly short manual from Philotrain only reads "shorten at the rear as needed, shorten at front as needed". Period. Well, that is a bit of a turn on two wheels. If you really want a nicely tweaked frame, you'll have to do a lot more.
|
|
|
Shortening the frame is of course the first job at hand. Sawing with an iron saw is no apparent success. At least not in my hands, as it won't go anywhere near as straight as I want it to. Knowing that, I sawed the back end it roughly to size... |
 |
and milled the rest on my drill stand with the crosstable.
WEAR SAFETY GLASSES!! |
 |
I measured the front end taking the cylinders versus the cylinder covers as a reference |
 |
Sawing off the small front end was hardly the trouble, so I milled at once. Milling by the way with the rather simple means I have, takes a lot of time. Approximately 0.2 mm is milled away after each pass. Do more and the cutter will start "hunting" and screaming. Easy does the job. I worked on this frame for about two hours, including all measuring of course.
|
 |
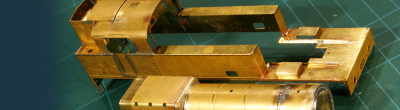
With this result |
 |
At two opposite spots the frame was a little too wide for the superstructure to slide over. So again I did a little milling. |
 The superstructure then slid easily over the frame. I put it on two axles to measure the buffer height. This kit is sitting reputedly too high on the frame. Well that was nothing too bad. The front end was about 1 mm too high, the rear end almost spot on. So the superstructure slopes a little to the rear. Lifting the rear is not the way to go, so the front has to come down. |
|
 |
The blocking issue seemed to be the cylinder/valve assembly which rests on the frame. It is a conceivable thought to mill the frame on the three spots indicated. |
 |
The cylinder assy is positioned too high relative to the axle anyway. The piston bar should cover the front wheelset's axle. So it can be lowered by 1 mm. I carefully considered the problem thinking over all consequences. When fitting and fitting and fitting the superstructure over and over again I concluded that the cylinders where NOT the limiting factor. For some reason somewhere in the internals of the superstructure something got hooked. I guessed the problem to be in the weight and the circuitboard in the loco. |
 |
First I had to get a fixed point to connect superstructure and frame. The manual recommends attaching the superstructure to the frame by one (!) bolt and nut connection at the front of the loco.
The least I could do was to get my fixing point first. So I drilled a 2 mm hole... |
 |
...and soldered an M2 nut to the frame over a corresponding hole in the frame. A bolt was appropriately shortened and voilà. |
 |
Next I disassembled the extensions of the circuitboard for the lighting of the loco. The front extension also functions for current pickup from the front wheelsets so I could not remove it. |
 |
Now back to the issue of the superstructure not falling deep enough on the chassis. I suspected the firebox throatplate to "hang" on the weight |
 |
I first milled away a generous part around the location of the throatplate (1). It helped but did not quite solve the problem. Then I suspected the throatplate to be rather narrow so I narrowed the weight (2) on both sides. Again the fit of the superstructure improved but it now tilted over the front end of the weight so I milled the top front end of the weight (3). Finally I also found the weight a bit too long and the circuit board hampering a good forward fit of the frame so small corrections were made here as well (4 and 5). |
 The superstructure now sits almost level and within the limits of MOROP norm (buffer center line 12.2 mm +/- 0.5mm over the railhead) |
|
Next issue to solve, was to make a reliable second connection between superstructure and frame. I took me a whole week of gazing and staring at the model, fitting the superstructure, taking it off again, contemplating a solution. A colleague builder had made some clips but I had no photo of it and I considered it not very reliable. Most solutions I came up with suffered from high accuracy and low reliability. Then my thoughts turned to Roco's original solution. They had hidden a bolt under the dome. The dome of the NS6200 is too far forward, but the safety valve was an option. After some consideration I turned that way. |
|
 |
I assembled the superstructure and frame and drilled a 2mm hole through the pre-existing hole for the safety valve. I disassembled again and I milled a slot in the weight and slid an M2 nut in until it fitted immediately under the hole in the firebox. I fixed it with CA |
 |
I made an M2 bolt to fit exactly into a corresponding hole under the safety valve. Then I realised that I had to solve a tiny problem. How on earth could I get the bolt to be tight and at the same time sit straight in line with the loco. I could not just solder the two together, it would never turn out right!! |
 |
The solution was to glueing. First I made a hole in a Post-It paper and stuck it around the bolt. I covered the firebox with thin plastic foil. I punched a small hole in it and slit the bolt though and bolted the superstructure as tight as needed to the frame. |
 |
Now I mixed five minute epoxy of the strongest kind I could find (400 kg/cm2) and placed the safety valve on the bolt head. And of course positioned it straight in line with the loco body. |
 |
After 24 hours of strenuous waiting to let the glue cure I turned the safety valve reversely and unbolted the superstructure. It worked as planned! |
 |
Oh wow!! |


Sign my
GuestBook